
|
 FAQs by Category FAQs by Category
 Installation Guide Installation Guide
|
| FAQ No.: | 00201 |
| Category: | Advanced Settings; Installation |
|
| | |
| Question: | How to use Group Policy to remotely install Curtain Client? |
| | |
| Answer: | This step-by-step article describes how to use Group Policy to automatically distribute Curtain Client to client computers. There are mainly 4 steps:
- Create a distribution point
- Create a Group Policy object (GPO) for Curtain Client MSI deployment
- Edit the new GPO to add MSI installer for the deployment
- Deploy Curtain Client MSI to specific security groups
Requirements:
- Windows Group Policy automated-program installation requires client computers that are running Microsoft Windows 2000 or a later version.
- Client computers must be in the same AD domain as the server where the Installer (Curtain Client MSI files) resides.
Steps to create a distribution point:
1. Log on to the server computer as administrator.
2. Create a share folder for storing Curtain Client MSI files that you want to distribute to client computers. This folder is the distribution point for the software package.
3. Set permissions of the share folder to grant users access rights to the distribution package. Give access rights to the following user groups:
- Administrators
- Authenticated users
- Domain users
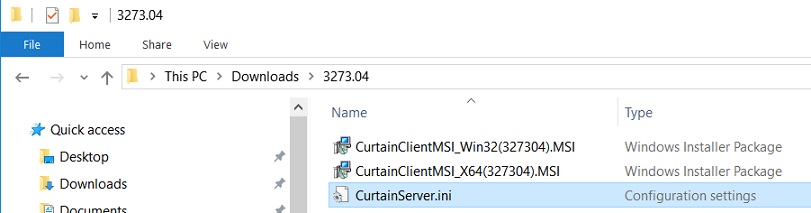
4. Copy Curtain Client MSI files (2 MSI files and 1 ini file) to the distribution point as below.
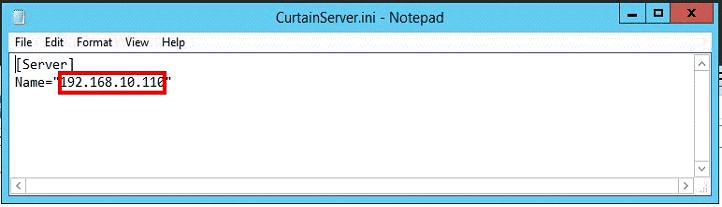
5. Edit the CurtainServer.ini file by using Notepad. Specify the IP Address or machine name of your Curtain Admin as below.
Steps to create a GPO for Curtain Client MSI deployment:
Then, you can create a GPO and link the GPO to any Active Directory container that contains the target computers to which you want to deploy the Curtain Client MSI. For example, an Active Directory container may be a site, a domain, or an organizational unit (OU). The following instructions direct you to use a domain as a container and then to use security filtering to target the GPO to specific computers. For your environment, you might want to link the GPO to a different container, such as an OU. You can link to any Active Directory container that you want. Also, you can edit an existing GPO instead of creating a new GPO just for deploying the Curtain Client MSI. However, we do not recommend that you edit the Default Domain Policy or the Default Domain Controllers Policy.
1. Open the Group Policy Management Console (GPMC).
2. In the console tree, right-click the domain name in the forest in which you want to create and link a Group Policy object (GPO).
3. Click Create and Link a GPO Here.
4. In the New GPO dialog box, specify a name for the new GPO, and then click OK.
Steps to edit the new GPO to add MSI installer for the deployment:
After you create a new GPO for Curtain Client MSI deployment, you must modify Software Installation in the GPO.
1. Right-click the new GPO, and then click Edit.
2. In Group Policy Object Editor, click "Computer Configuration > Software Settings > Software Installation".
3. On the Action menu, point to New, and then click Package.
4. In the Open dialog box, type the full Universal Naming Convention (UNC) path of the shared installer package that you want to distribute in the File name box. Type this path in the following format:
For example, \\ServerName\SharedFolder\CurtainClientMSI_Win32(327304).msi or \\ServerIP\SharedFolder\CurtainClientMSI_Win32(327304).msi
P.S.
- please make sure that you use the UNC path of the shared installer package.
- the filename of Curtain Client MSI file will be different according to the software version.
5. Select the Windows Installer package, and then click Open.
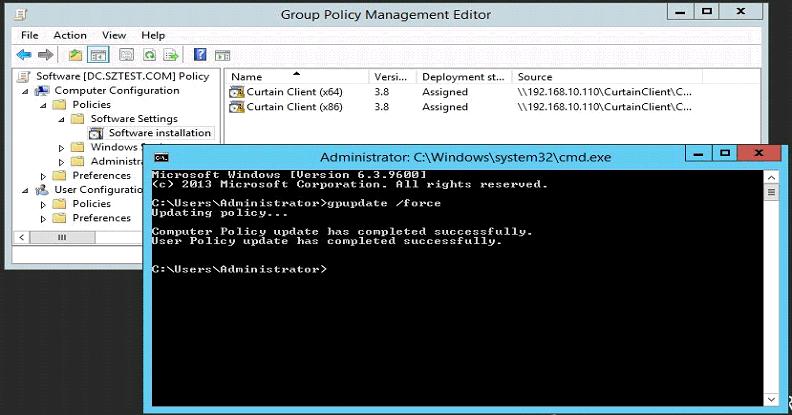
6. In the Deploy Software dialog box, click Assigned, and then click OK. The shared installer package that you selected appears in the right pane of Group Policy Object Editor. Please add both 32-bit and 64-bit installer for the deployment.

Steps to deploy Curtain Client MSI to specific security groups:
You can use security filtering in Group Policy to deploy the Curtain Client MSI only to computers that are members of a specific security group. For example, if you create a GPO at the domain level by using the procedure that this article describes, you can use security filtering to target the GPO only to the computers that you want. First, you must create the security group and add target computers as members.
1. In GPMC, double-click Group Policy Objects.
2. Click the GPO that you want to apply security filtering to.
3. In the results pane, click Add on the Scope tab.
4. In the "Enter the object name to select" box, type the name of group, user, or computer that you want to add to the security filter, and then click OK.
5. If "Authenticated Users" appears in the Security Filtering section of the Scope tab, select this group, and then click Remove. This makes sure that only members of the group or groups that you added can receive the settings in this GPO.
Note: The settings in a GPO apply only to the following users and computers:
- Users and computers that are contained in the domain, the OU, or the OUs where the GPO is linked.
- Users and computers that are specified in Security Filtering, or that are members of a group that is specified in Security Filtering.
You can specify multiple groups, users, or computers in the security filter for a single GPO.
6. After that, enter "gpupdate /force" in command prompt to update policy.
Then, the MSI packages should be distributed to all workstations under that Security Filtering. The software will be automatically installed next time when the workstations reboot.
Failure of MSI Distribution
Possible Reasons
1. Policy cannot be updated successfully
- Connection problem between workstation and domain controller
- Date/time are not the same between workstation and domain controller
- Other reasons
2. Workstations do not have sufficient access rights to the share folder that stores the MSI packages.
Problem Solving
1. If MSXML has not been installed, please install it.
- MSXML is included in 32-bit setup program, so you do not need to install it before the installation of Curtain Client.
- For 64-bit OS, all XP above OS include MSXML. To avoid installation failure, you can include 64-bit MSXML. However, you must distribute it before distributing Curtain Client.
2. Port: Please make sure Port 24822 is opened. Some firewall or anti-virus may block the port. You may temporarily disable the firewall and anti-virus before distributing the software. Windows firewall can be disabled through Windows policy, while anti-virus can be stopped by its management console.
3. File system or other reasons: Please make sure the workstations are NTFS. Also, please do not add workstations that already installed Curtain Client to the group for distribution. |
| |
| |
| |
| |
| |
|
| |
| |
| |
| |
|